【问题小解决】MySQL高可用集群之双主多从
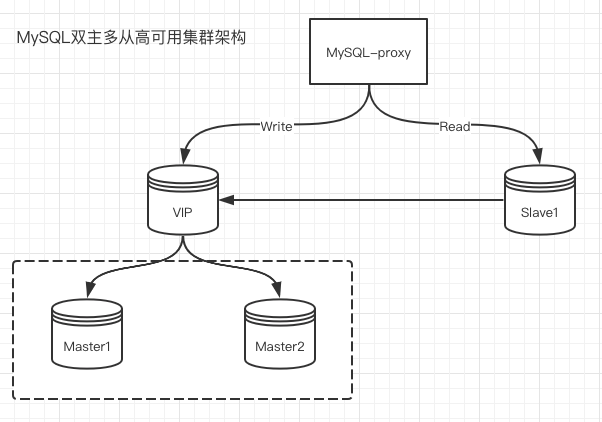
通常MySQL主从复制主要用来解决读写分离,分担服务器压力。MySQL互为主备实现服务的高可用;这里同时基于高可用和负载均衡。

环境准备
| 主机名/角色 | VIP | IP地址 | 操作系统 | MySQL版本 |
|---|
| Node0/master1 | 172.16.10.100 | 172.16.10.10 | CentOS8.1.1911 | 8.0.17 |
| Node1/master2 | | 172.16.10.11 | CentOS8.1.1911 | 8.0.17 |
| Node2/slave1 | | 172.16.10.12 | CentOS8.1.1911 | 8.0.17 |
安装MySQL
在所有节点上执行dnf -y install mysql mysql-server,并在master节点上配置server-id并开启bin-log
 1
 2
 3
 4
 5
 6
 7
 8
 9
10
11
12
13
14
15
16
17
18
19
20
21
| vi /etc/my.cnf.d/mysql-server.cnf
[mysqld]
# 主数据库端ID号,全局唯一,通常用IP地址最后一位
server_id = 10
# 开启二进制日志
log-bin = mysql-bin
# 需要复制的数据库名,如果复制多个数据库,重复设置这个选项即可
binlog-do-db = test
# 将从服务器从主服务器收到的更新记入到从服务器自己的二进制日志文件中
log-slave-updates
# 控制binlog的写入频率。每执行多少次事务写入一次(这个参数性能消耗很大,但可减小MySQL崩溃造成的损失)
sync_binlog = 1
# 下面这两个参数非常重要
# 这个参数一般用在主主同步中,用来错开自增值, 防止键值冲突,master2上面改为2
auto_increment_offset = 1
# 这个参数一般用在主主同步中,用来错开自增值, 防止键值冲突
auto_increment_increment = 2
# 二进制日志自动删除的天数,默认值为0,表示“没有自动删除”,启动时和二进制日志循环时可能删除
expire_logs_days = 7
# 将函数复制到slave
log_bin_trust_function_creators = 1
|
执行systemctl enable --now mysqld运行Mysql
配置双主集群
配置Master1
在master1节点上创建replication用户
 1
 2
 3
 4
 5
 6
 7
 8
 9
10
11
12
13
14
15
16
17
18
19
20
21
22
23
24
25
26
27
28
29
30
31
32
33
34
| ## master1
create user replication@'172.16.10.%' identified by 'replication';
grant replication slave on *.* to replication@'172.16.10.%';
show master status;
+------------------+----------+--------------+------------------+-------------------+
| File | Position | Binlog_Do_DB | Binlog_Ignore_DB | Executed_Gtid_Set |
+------------------+----------+--------------+------------------+-------------------+
| mysql-bin.000002 | 692 | test | | |
+------------------+----------+--------------+------------------+-------------------+
## 在master2上执行
CHANGE MASTER TO
MASTER_HOST='172.16.10.10',
MASTER_USER='replication',
MASTER_PASSWORD='replication',
MASTER_LOG_FILE='mysql-bin.000002',
MASTER_LOG_POS=692;
start slave;
show slave status\G
*************************** 1. row ***************************
Slave_IO_State: Waiting for master to send event
Master_Host: 172.16.10.10
Master_User: replication
Master_Port: 3306
Connect_Retry: 60
Master_Log_File: mysql-bin.000002
Read_Master_Log_Pos: 692
Relay_Log_File: node1-relay-bin.000002
Relay_Log_Pos: 322
Relay_Master_Log_File: mysql-bin.000002
Slave_IO_Running: Yes
Slave_SQL_Running: Yes
|
配置Master2
在master2上创建replication用户
 1
 2
 3
 4
 5
 6
 7
 8
 9
10
11
12
13
14
15
16
17
18
19
20
21
22
23
24
25
26
27
28
29
30
31
32
33
34
35
36
| create user replication@'172.16.10.%' identified by 'replication';
grant replication slave on *.* to replication@'172.16.10.%';
show master status;
+------------------+----------+--------------+------------------+-------------------+
| File | Position | Binlog_Do_DB | Binlog_Ignore_DB | Executed_Gtid_Set |
+------------------+----------+--------------+------------------+-------------------+
| mysql-bin.000002 | 692 | test | | |
+------------------+----------+--------------+------------------+-------------------+
## 在master1节点上配置主从同步
CHANGE MASTER TO
MASTER_HOST='172.16.10.11',
MASTER_USER='replication',
MASTER_PASSWORD='replication',
MASTER_LOG_FILE='mysql-bin.000002',
MASTER_LOG_POS=692;
start slave;
show slave status\G
*************************** 1. row ***************************
Slave_IO_State: Waiting for master to send event
Master_Host: 172.16.10.11
Master_User: replication
Master_Port: 3306
Connect_Retry: 60
Master_Log_File: mysql-bin.000002
Read_Master_Log_Pos: 692
Relay_Log_File: node0-relay-bin.000002
Relay_Log_Pos: 322
Relay_Master_Log_File: mysql-bin.000002
Slave_IO_Running: Yes
Slave_SQL_Running: Yes
|
现在master1和master2已经互为主从了。我们希望就是其中一个节点挂了不影响业务的正常运行。这里使用keepalived+lvs方案
安装lvs
安装keepalived
1
| dnf -y install keepalived
|
配置keepalived
master配置
 1
 2
 3
 4
 5
 6
 7
 8
 9
10
11
12
13
14
15
16
17
18
19
20
21
22
23
24
25
26
27
28
29
30
31
32
33
34
35
36
| vi /etc/keepalived/keepalived.conf
global_defs {
router_id MySQL-HA
}
vrrp_sync_group VG1 {
group {
VI_1
}
}
vrrp_script check_run {
script "/usr/local/bin/mysql_check.sh"
interval 60
}
vrrp_instance VI_1 {
state BACKUP
interface eth1
virtual_router_id 51
priority 100
advert_int 1
nopreemt
authentication {
auth_type PASS
auth_pass 1234
}
track_script {
check_run
}
notify_master /usr/local/bin/mysql_master.sh
notify_stop /usr/local/bin/mysql_stop.sh
virtual_ipaddress {
172.16.10.100
}
}
|
backup配置
 1
 2
 3
 4
 5
 6
 7
 8
 9
10
11
12
13
14
15
16
17
18
19
20
21
22
23
24
25
26
27
28
29
30
31
32
33
34
35
36
37
| vi /etc/keepalived/keepalived.conf
global_defs {
router_id MySQL-HA
}
vrrp_script check_run {
script "/usr/local/bin/mysql_check.sh"
interval 60
}
vrrp_sync_group VG1 {
group {
VI_1
}
}
vrrp_instance VI_1 {
state BACKUP
interface eth1
virtual_router_id 51
priority 90
advert_int 1
nopreempt
authentication {
auth_type PASS
auth_pass 1234
}
track_script {
check_run
}
notify_master /usr/local/bin/mysql_master.sh
notify_stop /usr/local/bin/mysql_stop.sh
virtual_ipaddress {
172.16.10.100
}
}
|
mysql_check.sh脚本,用于检测 MySQL 服务的状态,并在服务不可用的情况下停止 Keepalived,触发 VIP 漂移到备节点
 1
 2
 3
 4
 5
 6
 7
 8
 9
10
11
12
13
14
15
16
17
18
19
20
21
22
23
24
25
26
27
28
| #!/bin/bash
count=1
while true
do
mysql -e "show status;" > /dev/null 2>&1
i=$?
ps aux | grep mysqld | grep -v grep > /dev/null 2>&1
j=$?
if [ $i = 0 ] && [ $j = 0 ]
then
exit 0
else
if [ $i = 1 ] && [ $j = 0 ]
then
exit 0
else
if [ $count -gt 5 ]
then
break
fi
let count++
continue
fi
fi
done
/usr/bin/systemctl stop keepalived
|
下面是mysql_master.sh脚本,用于切换主从状态
 1
 2
 3
 4
 5
 6
 7
 8
 9
10
11
12
13
14
15
16
17
18
19
20
21
22
23
24
25
26
27
28
29
30
| #!/bin/bash
Master_Log_File=$(mysql -e "show slave status\G" | grep -w Master_Log_File | awk -F": " '{print $2}')
Relay_Master_Log_File=$(mysql -e "show slave status\G" | grep -w Relay_Master_Log_File | awk -F": " '{print $2}')
Read_Master_Log_Pos=$(mysql -e "show slave status\G" | grep -w Read_Master_Log_Pos | awk -F": " '{print $2}')
Exec_Master_Log_Pos=$(mysql -e "show slave status\G" | grep -w Exec_Master_Log_Pos | awk -F": " '{print $2}')
i=1
while true
do
if [ $Master_Log_File = $Relay_Master_Log_File ] && [ $Read_Master_Log_Pos -eq $Exec_Master_Log_Pos ]
then
echo "ok"
break
else
sleep 1
if [ $i -gt 60 ]
then
break
fi
continue
let i++
fi
done
mysql -e "stop slave;"
mysql -e "reset slave all;"
mysql -e "reset master;"
mysql -e "show master status;" > /tmp/master_status_$(date "+%y%m%d-%H%M").txt
|
…
 1
 2
 3
 4
 5
 6
 7
 8
 9
10
11
12
13
14
15
16
17
18
19
20
21
22
23
24
25
26
| #!/bin/bash
M_File1=$(mysql -e "show master status\G" | awk -F': ' '/File/{print $2}')
M_Position1=$(mysql -e "show master status\G" | awk -F': ' '/Position/{print $2}')
sleep 1
M_File2=$(mysql -e "show master status\G" | awk -F': ' '/File/{print $2}')
M_Position2=$(mysql -e "show master status\G" | awk -F': ' '/Position/{print $2}')
i=1
while true
do
if [ $M_File1 = $M_File1 ] && [ $M_Position1 -eq $M_Position2 ]
then
echo "ok"
break
else
sleep 1
if [ $i -gt 60 ]
then
break
fi
continue
let i++
fi
done
|
